
So, you’ve loved your mandolin’s strings into a saggy, baggy mess and your whole relationship has gone out of tune. It may be common to accept that you are the problem and spend thousands on couples therapy… but we are going to go full Hollywood and advocate for a plastic surgery face-lift. It’s time for new strings!
As we know from the putting-together-Ikea-furniture-breakdown scene in every sitcom, this journey from old strings to new has all the potential to bring on the tears. We didn’t want you to be alone during this difficult time, so we have compassionately curated this ultimate guide for restringing your mandolin.
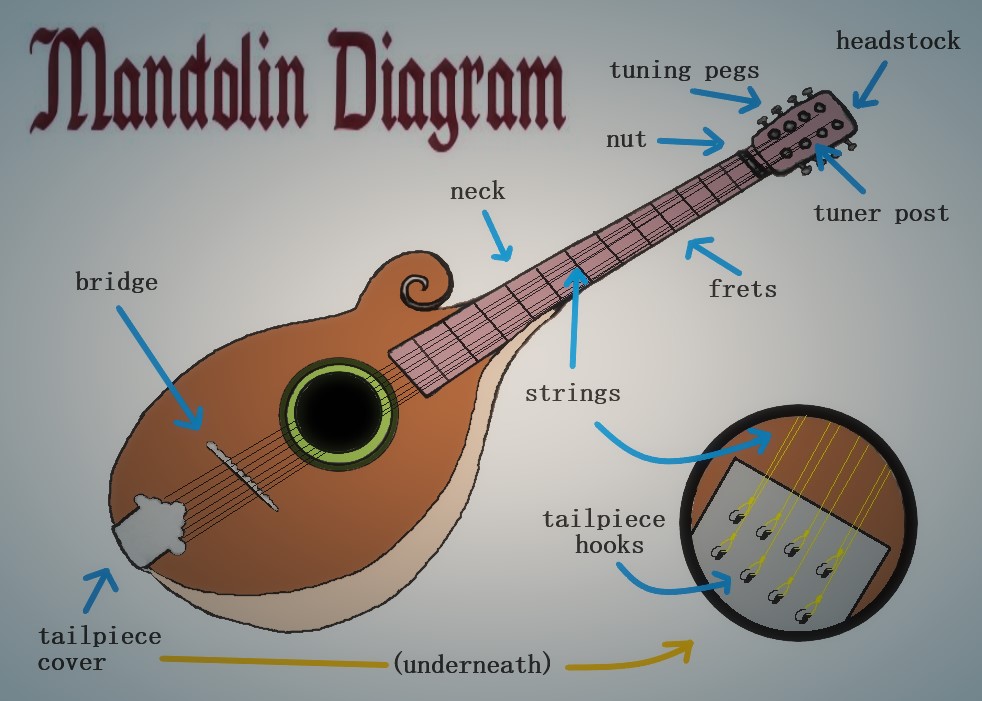
We will hold your hand tight as we walk you through everything you need to know and exactly how to put it into practice. We’ve even included common mistakes to avoid, a list of tools you’ll need, and a mandolin diagram with all the parts labeled. Everything short of a packed lunch. Once you’re prepared, we will take it slow and easy, carefully explaining each action through our 8-step instructional guide to restringing a mandolin.
Preparation
It takes around 15 minutes to restring your mandolin but only if you don’t have a nervous breakdown halfway through. Preparing your space and your tools beforehand can save you a lot of future frustration. Find a nice open space with good lighting where you can lay your mandolin face up on a flat surface and arrange your tools in easy reach.
The 3 Deadly Sins of Mandolin Strings
Restringing your mandolin is a relatively simple and straightforward process if you respect the mandolin gods. You’ll be sure to get into mandolin heaven so long as you avoid committing one of these three deadly sins…
- Removing all Your Strings at Once
Although it might seem temptingly logical to remove all the strings first and then replace them all at once afterward, there are a couple of good reasons for you to resist the urge.
First off, a mandolin’s strings are often actually what holds the instrument together. Depending on the kind of mandolin you have, if you remove all the strings at once, it might literally fall apart. In particular, the bridge is held down by the strings and will shift or come off without them. If you don’t resettle it properly, it can mess up your tuning.
Secondly, releasing the tension of a mandolin’s strings all at once can cause the body of the instrument to stretch and become malformed, especially if you keep on doing it over time.
- Mis-Matching Strings
Changing your strings one by one also makes it easier to ensure that the new string you attach is the same type as the one you removed. Each string on your mandolin is unique and it’s important that you put the right one in the right place or the sound will be off.
- Bending Your Strings
While restringing, you will also need to be careful not to bend your new strings. Keep them straight and kink-free or they might snap when you tighten them in place.
Get Your Tools Together
You’ll need:
- A Mandolin
Well, duh.
- Wire Clippers
Alternatively, you can use pliers or scissors.
- New Strings
Pack of 8 mandolin strings of the same type.
- Peg Winder
Optional. You can also use God’s peg winders: your fingers.
- Tuner
Optional. You can also use God’s tun… yeah, it’s your ears.
Get to Know Your Mandolin
To understand how to restring your mandolin, you’ll need to know the names of its relevant parts. As you progress through the 8-step guide below, you might feel confused at times. Instead of giving up and throwing your mandolin across the room, feel free to refer to our helpful chart below. No judgment here, we’ve got your back.
Step 1: Loosen Your First String
As the wise Iranian poet Hafez (and many a keg-standing frat boy) once said “Let’s get loose!” Technically he said “Let’s get loose with Compassion. Let’s drown in the delicious ambiance of Love.” Great advice for when you’ve finished restringing and are ready to compose your mandolin masterpiece… but for now, let’s stick to the first three words.
- Find the most accessible outer string.
- Follow your chosen string up the neck of your mandolin until you find the tuning peg it’s attached to.
- Fiddle with your tuning peg a little to figure out which direction tightens it and which direction loosens it.
- Turn the tuning peg in the direction which loosens the string. When the string is loose enough that it can be detached from the tailpiece hook and removed by hand (don’t do that bit quite yet, though), you can stop turning.
Step 2: Remove the Tailpiece Cover
If you’re looking down at your bare-bottomed mandolin in confusion, don’t fret (ha!). Not all mandolins have a tailpiece cover. If you don’t have one, you can skip this step. For all those with more conservative mandolins, let’s gently and respectfully undress them.
You’ll find your tailpiece, as previously implied, at the bottom of your mandolin. From the tuning pegs, follow the strings down to the other end of your instrument and you should find a metal plate. Generally, it looks like the silhouette of an ancient Chinese temple.
This is the covering of the place where your strings attach to the bottom of your mandolin and it helps to stop your arm from being ripped to shreds.
Depending on the style of your mandolin, to remove your tailpiece cover you will either need to:
- Slide it down and off the bottom.
- Lift it up and pop it off with a little pulling.
Try both and see which one works.
Step 3: Remove Your First String
Now you’ve got your tailpiece’s covering off and your string is nice and loose, it’s time to teach that string a lesson in morals by kicking it out of the house. Sure, you made some sweet music together and sure, the damage done was by your own hand… but if we’ve learned anything from male-centric 90’s romcoms, it’s time to ditch this string of past mistakes in order to make room for a newer, younger model.
The good news is that removing the string is easy if you follow this process:
- Follow your loose string down to the tailpiece where it is attached with a simple loop.
- Remove the string loop from its little tailpiece hook.
- Follow the string back up to the tuning peg at the top of the neck.
- Unravel the string from around the tuning peg and tuner post.
- Pull the string through the hole in the tuner post and you’re home free.
Step 4: Attach a New String
That old string was no good for you. She was only stringing you along. It’s time you had a new string in your life. A strong, flexible, glossy string that will make you a better player. It’s up to you to find the right one, but once you have, we are ready to help you lock it down and tie the knot.
- When you’re ready to commit, put the ring (string loop) on your mandolin’s finger (tailpiece hook). Take your new string and place the looped end over the now-vacant hook of your mandolin’s tailpiece.
- Hold the string tight so that it pulls against the hook and won’t slide off.
- Take the other end of the string and pull it up to the empty tuning peg.
- Align the string along the fretboard and make sure it stays in place by settling it properly in the slots on the bridge and nut (at the top of the fretboard). Observe your other strings to see how it should sit.
- Take the end of the string and thread it through the hole in the post. Then, pull the string all the way through.
- Keeping it generally taut (leave some slack), kink the string a little before winding it around the tuner post a few times to keep it in place.
- Turn the tuning peg the opposite way to when you loosened your old string (a.k.a.: in the direction of tightening) and wind the string until tight.
- If it’s all in place, and looking good, you can go ahead and cut off any excess string (quite close to the post) with your wire clippers.
You did it!
Step 5: Repeat Process With Remaining Strings
You have now actually replaced a whole mandolin string and we couldn’t be more proud. You should be proud of yourself, too; you learned a new skill when you could have been watching tv or eating.
All you have to do now is repeat this process seven more times. Do a little celebratory dance around the house, text your mom about your success, and then sit back down and replace all your other strings.
Step 6: Stretch Those Strings, Baby
Look at those beautiful strings! We’re sure you miss your old ones but don’t worry, you’ll soon forget all about them with some new string yoga. To prevent these strings from getting saggy before their time, you’ll need to take some preventative measures.
- Carefully, tighten your strings just a bit too much (not so much that you break them).
- Leave them to rest in this position overnight before letting them relax again in the morning.
Step 7: Replace Your Tailpiece Cover
Get your mandolin ready for action by sliding or popping the tailpiece cover back into place. If you did the job right, everything should slide right back into place.
Step 8: Tune Your Mandolin
Your mandolin has basically just been through surgery. It’s been an intense emotional period for both of you and it may take a little while for your mandolin to find its feet again. Give your new strings time to settle in and try not to become frustrated as they go in and out of tune, trying to adjust to their new home. Just be patient and retune them as needed. With a little TLC, they will soon be hitting the right notes.
Conveniently, we’ve also written the ultimate guide to tuning your mandolin!

Outro
We are so proud of the way you handled yourself out there. Things looked pretty rough sometimes but, in the end, you made it through in one piece.
Now, we know you’d like to thank us for all the love and support and step-by-step instructions but no, we couldn’t possibly accept your mounds of gold. In return, all we ask for is that you compose the best mandolin song ever written… and dedicate it to us here at MusicVibe, of course.